
The future bright website design process
Phase I: Discovery
Phase II: Design
Phase III: Build
Phase IV: QA and Launch
Phase V: Promote!
Our website design process
We have developed a detailed process that includes our clients every step of the way. As a boutique shop creating custom websites, we provide personalized service with one core objective: provide you with a system that you love, and that is an engine for your success!
Each project officially begins and finishes with an onboarding call so that you feel informed and confident about the progress of your website or social media build. Our goal is to create a product that reflects your brand, supports your processes, and engages your audience.
View Our Process Details
Phase I: The Discovery Phase
Step 1: Reach out to us by calling Founder and Digital Strategist Wendy Louise Nog, MSTM
Creative Director | Wendy Louise Nog | [email protected] | (415) 275-0970
Step 2: Wendy will have a brief consultation with you by phone or in person to get a general idea of what your needs are, and to identify a “Scope of Work”.
Step 3: Wendy will discuss your project with the Future Bright team, and use their input to prepare a rough estimate for you to review and discuss.
Step 4: Once a final Scope of Work and costs are identified, a final estimate will be generated and sent to you for approval. Upon your approval of the estimate, we will send you an invoice for a 50% deposit and the project is officially under way!
Step 5: Activate Project Start-Up Sequence!
Wendy informs her team that the project is officially on the books! Your project is put in motion, and goes through our “Project Start-up Sequence”. You will receive multiple e-mails throughout that sequence over several days.
Step 6: We begin to collect critical information from you such as social media accounts, domain name registration and website hosting accounts, and we may ask you to do a SWOT analysis of your business and website as well as provide us with your competitors, and websites that you like. If you have an already existing site, we will run a site assessment, and record your analytics and social media data so that we have a baseline to compare with down the road.
Phase II: The Design Phase
Step 7: Design
Many of our projects do not require an official design phase, especially those that are entirely focused on photography and imagery. We build the design right into the development site. This is extremely cost effective. For some projects though, a formal design process is needed.
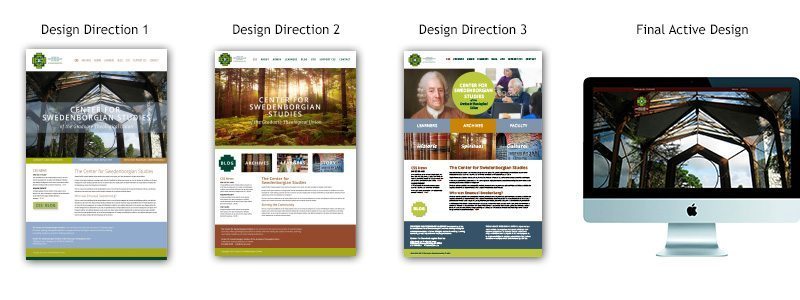
In a formal design process, typically you are presented with three design comps. You pick one, or a combination of several that we refine, and after a bit of refining and back-and-forth, a final design is chosen by you. If you already have a design palette, we incorporate those colors. If you do not have a logo or brand colors, we will need to add the creation of that palette to the estimate. Below are design comps from one of our projects. You will see that the end result is a combination of elements from the first three comps.
Phase III: The Build Phase
Step 8: We launch your shell site on a development server, and implement the design either with dummy content, or content that you have ready or is already on your existing site.
Step 9: We put together all of the pieces, from SEO to Social Media, new content, your newsletter sign up and system, and more.
Step 10: Final Content! We have found that what takes the longest is for our clients to produce final content. We will help you to move through this process.
Phase IV: The Testing, QA & Launch Phase
Step 12: Testing & QA – we run through an extensive QA list to ensure that as we build your site, nothing is overlooked. You will be a part of this process as well.
Step 13: Launch! This is usually done over the weekend when traffic is slow, or at night. Over the next couple of days we continue to go through the site to test that everything is working as expected. The site is then submitted to search engines (Note that it can take up to two weeks for your site to be indexed by Google). We then officially release your site from Post-Launch QA, and it is time to celebrate!
Step 14: Training! Training usually starts long before launch, as it is a great opportunity for you, the client, to learn how to work on the site before it is live. After the site is launched, we ensure that you have total control of your site and understand how it works and how to manage it. Typically we have the home page set up so that you can easily swap out new and fresh content continuously.
Step 15: Project Review – It is important that we get your input on how the project went so that we can learn how to improve our process, and to talk about how we can support your successful online presence moving “forward”!
Congratulations! You are ready for: